Making your own flour is cheap and it's easy. I've been making mine in a coffee grinder because I don't have a Vita Mix or a good food processor, which is what is typically used. My coffee grinder is not big so I have to process in several batches - this is no big deal, once I get going, it gets done quickly. Coffee grinders are often sold cheaply at thrift stores (that's where I bought mine), if you buy one from there, clean it real well. If you wash it with soap and water, dry it upside down on a rack so water won't get in the motor and there won't be any chance of electrocution.
You will need: a coffee grinder (one that will never grind coffee again)
slivered almonds
2 medium sized bowls
fine mesh sieve
large zip top baggie
It's best to buy your ingredients in bulk as this will save you money. For the almond flour, it's best to use blanched (skins removed) almonds. You could buy whole, raw almonds and put them in boiling water for about a minute then squeeze the nut between your finger to remove the skins, BUT I found slivered almonds in the bulk section, already blanched, and it cost only 10 cents more than the whole almonds. Regular almond flour is pretty pricey (I paid $11 for a 16 oz. bag! It was my first time using it). For 10 ounces of almonds, I got just over 3 cups of flour.
Put about a handful of almonds in your grinder and pulse about 15 times.
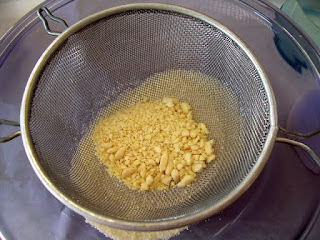
Next, you may need to pick up your grinder and shake or bang with your hand it to loosen some clumping (I use my thumb or finger to remove any flour that has stuck to the inside of the grinder) then dump it into a sieve that's over a bowl and shake the flour into the bowl - what you want is a very fine meal.
You will have some small chunks leftover which can get re-grinded or eaten - I keep processing the chunks until there's less than a tablespoon left.
Pour the newly processed almond flour into a large zip top baggie and use as desired. Store your almond flour in the freezer for best results, in fact, all nuts should be store in the freezer.
I use both bowls for processing and holding the flour.
For grinding rice flour, just buy yourself some brown rice (white is ok too, but you know that brown is better for you) and process it as you would like the blanched almonds. In the end, I had some pieces that were the size of quinoa and I just left it, after baking those made my bread crunchier.
Both almond and rice flours are great substitutions for making gluten free foods. They can be used together or individually. There are tons of recipes on the Internet that use both of these flours - do a search and see what delicious recipes come up. Although it takes a little bit of work, making your own almond and rice flour is easy, gratifying, and very economical.
Happy Grinding!!
Comments or questions are always welcomed. I would love to hear what you think of this tutorial or any of my other posts. Thanks!


