Wednesday, December 14, 2011

Crystallized Ginger Recipe


  Ginger is a rhizome or root of the ginger plant. It is used as a spice in cooking and baking, it has a bite to it that is a little spicy, and is used frequently in Asian dishes. Ginger is the cousin to turmeric and cardamom. Most notably, ginger is used in candied form to aid in digestive issues. It is excellent in relieving nausea and stomach discomfort. The flower is used widely in Hawaii to make leis - a flowered neck garland. It is a very delicate flower and smells real sweet.

Almost a tablespoon of ginger in the bottom of the bag!
Many natural food stores sell crystallized ginger and the cost can be pretty pricey. Crystallized ginger is basically cooked in a sugar syrup and then coated in sugar. The amount of sugar used for the coating is too much for me. A lot of times, I taste a lot of sugar instead of ginger. What I have been doing recently is scraping off the sugar as I am taking a piece of ginger out of the bag - it helps, but I still taste the sugar. Several months ago, I tried making my own crystallized ginger and it did not come out. The ginger didn't candy right and it all stuck together and was hard - maybe I didn't cook it long enough.

I've been wanting to try making it again as I have been eating a lot of crystallized ginger (I like the taste and it satisfies my sweet tooth in the evenings). I recently saw Daphne Oz (Dr. Oz's daughter) on The Chew and she made candied citrus peel. The segment was real quick, no real demonstration, but her explanation was so easy, I decided to try it with ginger - and it worked. I am very pleased with how it turned out.

Here is how I did it. I bought a huge chunk of ginger root - it was $3.99 a pound and I had just under a pound (sorry, I didn't get a pic of that huge root before I cut it up). Make sure the ginger you buy is not wrinkly and soft (that means it's old) - the one I bought was firm and thick.

I cut it up in manageable pieces and used the edge of a large spoon to scrape off the skin (which is not edible). I tried using a vegetable peeler, but it took off too much ginger, so I stuck with using the spoon. **Update** I figured out that if you peel the ginger like a potato - use a small spoon and flick the skin away from you, into a sink that has a trap to catch all the peel, the peeling process goes a lot faster. If you use more wrist action, you will have less wear on your fingers and joints.


All peeled and ready to be sliced. The peelings are thin and do make a mess.


This is what I used to get even slices. If you don't have a slicer, you can use a sharp knife and cut into thin slices.


I started out using this large skillet. I put in 2 cups of filtered water and 1 1/2 cups of sugar. Your basic simple syrup recipe is 1 cup sugar to 1 cup water - I wanted less sugar.


After the sugar dissolved, I decided that the cooking surface area was too large, so I dumped the sugar mixture into a large sauce pan. I added the ginger and mixed everything. I set my timer for 2 hours. **Update** I have since updated this whole process - check it out here.


In the middle of the cooking time, I decided to strain out the bits of peel, so I alternated between the large skillet and sauce pan to strain the sugar syrup (I have a metal tea strainer, which worked great for this). 


After 2 hours, I put the candied ginger into a large strainer to remove the excess sugar syrup.


I put the ginger onto a foil lined cookie sheet and sprinkled about a tablespoon of sugar on top. I wet my hands (so nothing would stick) and coated the ginger with the sugar. 


I placed the ginger pieces onto a cooling rack, some went directly on the foil, to set up.


There was hardly any sugar left on the bottom of the cookie sheet after all the sugar was coated on the ginger.
If perchance your ginger is "wet" and sticks together, place your slices on a cookie sheet in a single layer and bake at 200 degrees for 1 hour. Your ginger should not clump up when done - a few that stick together is ok.

The taste is really good, you get that ginger bite you expect from ginger, unlike the store bought kind where you taste more sugar and less ginger. I really like it and plan to never buy crystallized ginger from a store again. Oh, and the leftover ginger sugar syrup . . . I plan to use it the next time I make turmeric milk.


Please give this a try I really think you'll like it as much as I do.


Ginger simple syrup


Thanks for reading!!

Comments or questions are always welcomed. I would love to hear what you think of this recipe or any of my other posts. Thanks!


Monday, December 12, 2011

My Turmeric Milk Recipe

**I am sipping some right now as I write this post.**  Turmeric is a very healthy and important spice to have in your arsenal. It is anti-inflammatory, antibacterial, and can be used in many ways. Lately, there have been numerous reports on the Internet about tumeric and it's great healing properties. Turmeric is also known as curcumin, which is the active ingredient in it.

I never knew about this powerful spice until last year when my daughter Dawn came home for a visit. We we shopping at WalMart and she bought a bottle of turmeric. I asked her later what she had bought it for because we weren't cooking anything that would require that spice. She said that turmeric has great healing properties and she was making tea with it. Well, months go by and on Facebook a lot of blogs that I follow were posting about turmeric and how great a spice it is. BTW, always buy your spices at a store that sells them in bulk (natural food stores), those are fresher and are rotated constantly by the people who buy them, and you can buy them by the ounce. The spices in your grocery store have been sitting there for who knows how long and you have to buy what you see.

This is what turmeric looks like. It looks very similar to ginger root, except it's a pretty orange color.

The first recipe I ever came across is from Lexie's Kitchen (update: link is broken). I really like that she tied turmeric to Hawaii (where I'm from). Her blog post talks about how turmeric or 'olena as the Hawaiians would say came to Hawaii.  Her recipe is fabulous and worth trying - this really got me hooked into this awesome drink.

Another blog post is from Mark's Daily Apply. This is another blog I follow and he includes other recipes you can make with this wonderful spice. Mark uses real ginger and adds cayenne instead of using peppercorns.

Well, since making this milk for months now, I have come up with my own recipe. I use almond milk (original flavor), but you can use whatever milk you drink. I bumped up the ginger amount, because ginger is warming and I like it. I also increased the cinammon to a 1/4 teaspooon, another warming spice. I don't use a sweetener.

What I really like about this recipe is that it is caffeine free and can be dairy free if you use almond, coconut, rice or soy milk. On a cold night, you can drink this before going to bed and it will warm you up.

My success to this recipe is to constantly stir while the ingredients are being incorporated. If you don't stir, the spice will gum up be very thick in the bottom of your mug - you stir only for five minutes and it goes by real fast. Also, I tried to up the amount for turmeric to a full teaspoon and it didn't work, it was too much. You can also double the recipe like Lexie has done. Here is my recipe for turmeric milk:


You will need:

1 cup of almond milk
1/2 tsp. of turmeric
1/2 tsp. of ground ginger
1/4 tsp. of ground cinnamon
about 4-5 grinds of freshly ground peppercorns
1/2 tsp. of sugar or honey (optional) - I don't use any

Place all the ingredients into a small saucepan on medium heat and bring to a boil. Turn heat to low and simmer for five minutes, constantly stirring.

UPDATE 12/2018: I now use cashew milk - I have since become sensitive to almond milk and almonds.


After five minutes, your milk should look like this.


Pour into your favorite mug and enjoy!!


Drinking turmeric milk is great on days when you wake up to this . . . 


Stay warm my friends!!!

Comments or questions are always welcomed. I would love to hear what you think of this tip or any of my other posts. Thanks!


Wednesday, December 7, 2011

Sanitizing Your Kitchen Sponges

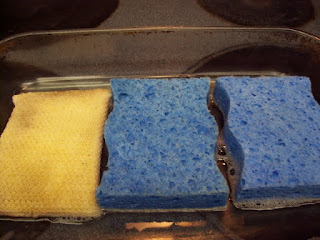
We all have some kind of sponge that we use to hand wash our dishes or to clean messes. After a while they get real gungy, and in my case, very stinky. I've always hated that after just a few uses of my sponges, that they get stinky - especially my meat sponge (the blue ones in the pic). I use my meat sponge to clean anything that comes in contact with raw meat (I even have a separate cutting board and knife for raw meat - you should too). My regular sponge (the white/yellow one) will often get gross and eventually need replacing.

If you don't fully squeeze out all the water in your sponges and just let them sit, they will get gungy and start to stink (I do that when I'm in a hurry). I have been getting tired of having to replace my sponges all the time - they aren't very costly, but still.

I recently read on the Internet about sanitizing your kitchen sponges using dishwasher cleaner - it has bleach in it, which makes the perfect sanitizer. There were no specific instructions, so I made up my own.

You will need:  your dirty sponges, a flat glass (or ceramic) container to fit all your sponges, and some dishwashing soap (rubber gloves if you are sensitive to bleach).


If your sponges are dry, get them wet and wring them out.


Put about 2 tablespoons of dishwashing soap into your flat glass container. Add about 1/2" - 3/4" of water and mix the soap into the water - wearing rubber gloves if you need to.


Place your sponges into the container, pressing to get some of the soap into the sponges.


Set your timer for 10 minutes.


After 10 minutes, turn sponges over and press to get the soapy solution all through the sponges.


Set your timer for another 10 minutes.

After that, rinse your sponges thoroughly and let them dry. Put your glass container into the dishwasher for the next run.

This is my second time doing this and I love it! No more gungy, stinky sponges. Some of the stains will still be there (because they're stains), but it won't be gungy - I promise. I plan to do this every 1-2 weeks depending on how my sponges look (and smell). So if you have gungy/stinky kitchen sponges, take a tip from me and sanitize them quickly and easily.


Happy Cleaning!!!


Comments or questions are always welcomed. I would love to hear what you think of this tip or any of my other posts. Thanks!
                    

Sunday, November 20, 2011

How to make Almond or Rice Flour in a Coffee Grinder


Making your own flour is cheap and it's easy. I've been making mine in a coffee grinder because I don't have a Vita Mix or a good food processor, which is what is typically used. My coffee grinder is not big so I have to process in several batches - this is no big deal, once I get going, it gets done quickly. Coffee grinders are often sold cheaply at thrift stores (that's where I bought mine), if you buy one from there, clean it real well. If you wash it with soap and water, dry it upside down on a rack so water won't get in the motor and there won't be any chance of electrocution. 

You will need: a coffee grinder (one that will never grind coffee again)
                     slivered almonds
                     2 medium sized bowls
                     fine mesh sieve
                     large zip top baggie


It's best to buy your ingredients in bulk as this will save you money. For the almond flour, it's best to use blanched (skins removed) almonds. You could buy whole, raw almonds and put them in boiling water for about a minute then squeeze the nut between your finger to remove the skins, BUT I found slivered almonds in the bulk section, already blanched, and it cost only 10 cents more than the whole almonds. Regular almond flour is pretty pricey (I paid $11 for a 16 oz. bag! It was my first time using it). For 10 ounces of almonds, I got just over 3 cups of flour.


 Put about a handful of almonds in your grinder and pulse about 15 times. 


Next, you may need to pick up your grinder and shake or bang with your hand it to loosen some clumping (I use my thumb or finger to remove any flour that has stuck to the inside of the grinder) then dump it into a sieve that's over a bowl and shake the flour into the bowl - what you want is a very fine meal. 


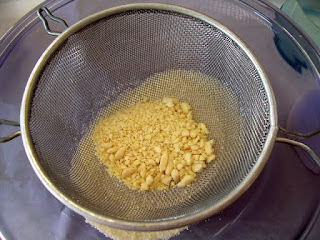
You will have some small chunks leftover which can get re-grinded or eaten - I keep processing the chunks until there's less than a tablespoon left. 


Pour the newly processed almond flour into a large zip top baggie and use as desired. Store your almond flour in the freezer for best results, in fact, all nuts should be store in the freezer.

I use both bowls for processing and holding the flour.

For grinding rice flour, just buy yourself some brown rice (white is ok too, but you know that brown is better for you) and process it as you would like the blanched almonds. In the end, I had some pieces that were the size of quinoa and I just left it, after baking those made my bread crunchier.

Both almond and rice flours are great substitutions for making gluten free foods. They can be used together or individually. There are tons of recipes on the Internet that use both of these flours - do a search and see what delicious recipes come up. Although it takes a little bit of work, making your own almond and rice flour is easy, gratifying, and very economical.

Happy Grinding!!

Comments or questions are always welcomed. I would love to hear what you think of this tutorial or any of my other posts. Thanks!


Monday, November 7, 2011

Laughing Cow Mac n Cheese Recipe

Most of us know about The Laughing Cow cheese (TLCC) and  how creamy and tasty they are. Did you know they are lower in calorie than most other cheese spreads?

Lisa Lillen, aka Hungry Girl, who has been featured on the Rachael Ray show numerous times has an innovative way of creating lower fat foods and has figured out how to shop for lower fat foods in our supermarkets. She has come up with great, healthy substitutions for many of our favorite foods. One of those subs is with cheese. She uses TLCC in many of her recipes. This cheese has only 35 calories per wedge and comes in a variety of flavors - you get 8 wedges per container, and it's very reasonable at just over $4 a container.

I wanted to make macaroni and cheese and thought of trying to use TLCC since it's already creamy, and I just had to incorporate it into a sauce. Here's how I did it -

Ingredients:

1/2 c. chicken stock
1 c. milk of choice
2 c. gluten free pasta
olive oil
brown rice flour
3 wedges of Laughing Cow cheese
salt/pepper
nutmeg

I first boiled some gluten free penne brown rice pasta for the allotted time and set it aside.


I took a large sauce pan and put in 1/2 cup of chicken stock and 1 cup of almond milk and let it heat up (I used the same pan I boiled the pasta in).


I then took a large skillet, on medium heat, and put in a fair amount of olive oil and added about 2 tablespoons of brown rice flour and I whisked the 2 together.


Next, I threw in 3 wedges of the light garlic and herb cheese.


I proceeded to whisk the cheese into the oil/flour mixture. At first it will seem grainy and like it won't want to incorporate, but KEEP WHISKING!


After the cheese is mixed in, pour in the heated milk mixture and add a little salt, some pepper and a few grates of nutmeg - whisk until heated through. **Tip - see the line on the back of my wooden spoon, then you can do that with your sauce, it's the perfect consistency.**


Add your pasta and mix to incorporate.


Serve hot with desired main course (or not). We had ours with roasted veggies.

Happy Whisking!!

Comments or questions are always welcomed. I would love to hear what you think of this recipe or any of my other posts. Thanks!

Sunday, October 30, 2011

Risotto Cakes

Risotto is basically a creamy rice recipe that is made with arborio rice, wine, onion, garlic, chicken stock or broth, and cheese (usually parmigiana cheese) - I used nutritional yeast. Here is a recipe to make your basic risotto. My ratio is 1 cup rice to about 3 cups of warmed stock. I've used either a wide, deep skillet or a large sauce pan - it doesn't matter. If you want to have risotto one night, then make the cakes another night, I suggest doubling the recipe so there is enough.

Usually with leftover risotto, aranchini is made. You basically form the rice into balls, stuff cheese in the middle - then you flour, egg, bread and fry them. I've always wanted to try this, but didn't want to go through the hassle of rolling into balls and doing the whole flour, egg, breading, then frying them (I don't like frying round things).

We had risotto last night and I made extras with the intention of making these patties. The risotto needs to be chilled before you can make the cakes, the chilling helps bind the cakes when they are cold.

First I put some brown rice flour into a pie pan and added some garlic and onion powder and some pepper. I wet my hands, then scooped a fair amount of risotto into my hands and shaped it into a patty. I coated the patty well on both sides with the flour mixture and placed in a non stick skillet with heated olive oil. I let it fry for about 2-3 minutes on each side till it was nicely brown. I made 3 patties to try and only ate 2, I'll save the other for later, toasting to crisp up again.

The risotto cakes were crunchy on the outside and soft in the middle. The only thing I would do next time is add some more nutritional yeast before forming into patties, you could add your cheese of choice. This was very yummy, I love the crunchy/soft texture and I plan to make this again - real soon, tho I am plan on making risotto cakes out of the entire batch of risotto.

So next time you make risotto and have some leftover, try and make some risotto cakes, I bet you'll love them as much as I do.

Happy frying!!

Comments or questions are always welcomed. I would love to hear what you think of this recipe. Thanks!

Friday, October 14, 2011

Port Townsend

Ok, everything's put away and back in their place. We just came back from a camping trip to Port Townsend. We had a great time and Heather was able to come and enjoy some time with us. We like to stay at Point Hudson, it's a marina that's right at the end of town and is a wonderful place to stay. We've been there now about 6 times and each time is better than the last. We love that the RV park is right in town and right on the water. Our RV spot was right by the water - literally 20 feet from the Pacific Ocean, it was great to hear the water lapping on the rocks. Because it's fall, we really weren't sure what the weather was going to be like. We were hoping for very little rain and that's what we got. Apparently, we just missed a small rain and wind storm the night before. The weather for the rest of the days were perfect, and of course, the humidity was high.

There is an awesome restaurant right at the park called T's Restaurant - it's become a favorite for us whenever we are in town. It is casual, fine dining at it's best. The menu is great and because it's right there at the park, you don't really have to dress up. A lot of the patrons are campers, but there are many who come eat there because the food is great - customer service is great too.

You know when you go camping, sometimes, it's either the place that's interesting or the people that are interesting? This time, it was the people. Out of the entire RV park, our side of the park ended up with 4 RV's in one spot. Our neighbors were very nice. Soon after we got settled, we got a neighbor. It was a couple who had 2 cute little pugs. The man's name was Mike and I am sorry to say that we forgot his wife's name. They were very nice people and it turns out that they were on there way back from Oregon. They went to pickup the motor home they were it. We thought they were from Oregon because of the license plate, but they're from Sequim!

We thought this was so cool - after dinner on Tuesday, we went for a walk on the beach. As we're coming back, we meet the campers that are in the 2nd spot next to ours - next to Mike's motor home. Their names are Patty and John. We start chatting about camping, when Patty asked if we were there in May (we were actually, with our oldest daughter Dawn). We told her yes and she said she remembered talking to one of our daughters (it was Dawn). In May, they had a spot that was across from us - this time, they were 2 spots away from us. Turns out Patty and John are from California and they love to come up here, they were going through Oregon after leaving Washington. When they do come here, they don't make a reservation, they just show up and take what they get - how ironic that they were in a spot by us and it May we were both there at the same time also. I didn't remember them, but Jim did - I bet Dawn would remember them. Isn't that neat? We've met so many nice people camping.

On Wednesday, we went to do some downtown shopping. I love going to Wynwood Beads, they have an awesome array of beads and charms - many of my creations have come from this fabulous store. While at Wynwood Beads, Jim starts chatting with the owner. That day, there was a strong odor of sewage permeating the town and Jim was asking what might be causing that odor. The owner said that it was coming from the sea gulls. The sea gulls are a huge problem in town and it get exacerbated by the food businesses who throw out leftover food for the birds to eat, and what goes in has to come out and it causes a large problem, so the food businesses have been told to not throw out their leftover food.

We also found out that back in the day, Port Townsend was designated to be the original Seattle. There is an underground, but not the kind of underground that we think of. Port Townsend is one of several towns on the Pacific Northwest to have Shanghai Tunnels. Now I've heard of the term "shanghai" and I've known it to mean to get taken by someone. Well it's true, it was called shanghaiing back in the 1800's where men were "taken" from saloons forcefully and forced to work on ships. That's why a lot of saloons back then had trap doors. These doors led to tunnels built to take kidnapped men to ships and they were forced to become part of the ship's crew. Here is a pic and history of shanghai tunnels. Here is a another pic of a larger tunnel in Tacoma.

Apparently, the tunnels under Port Townsend flood frequently and river otters travel through them to come and land and have their babies. River otters are said to be the the size of a medium-sized dog and can be seen coming onto land.

So, that was our adventure in Port Townsend. We go every year and we always learn something new - this time, we learned about some of its past history. Next time you go vacationing, ask about the area you are visiting and you might learn something you never knew before.


Thanks for reading!!


Sunday, October 9, 2011

Peppers Casserole Recipe

Stuffed Peppers is a great dish that Jim and I both love to eat, but I didn't like that the stuffing fell out each time I went to cut the pepper - I like a mix of everything in one bite. Then I thought, "why not put the peppers in the casserole, then there's no problem of the stuffing falling out." I still get peppers in my meal and nothing falls out - genius!

Peppers Casserole

2 large green or red bell peppers, sliced thin. I've been using frozen peppers in a  
        bag, it's cheaper, plus you get 3 colors in the bag - very colorful
Extra-virgin olive oil
1 medium yellow onion, sliced thin
1 clove of garlic, chopped
1 lb. of lean ground beef
1 cup of cooked rice
1 cup chopped tomatoes, fresh, canned or roasted
1 tbsp. chopped fresh oregano or 1 tsp of dried oregano
Salt & pepper
1/2 cup ketchup
1/2 tsp of worcestershire sauce
Dash of tabasco sauce or other hot sauce
Cheddar cheese (optional)

Sauté ground beef in oil, drain and remove to pie pan or plate.

In the same pan, sauté peppers and onions in oil for several minutes till slightly soft, but still crunchy. Add cooked ground beef then salt, pepper, rice, tomatoes and oregano - mix well. Cook until heated thru.

Combine ketchup, worcestershire sauce, hot sauce and pour on top of meat mixture. Can mix sauce in or leave as a topping (the original recipe uses it as a topping, but I mix it in as the flavors mixed together is very yummy). Sprinkle on cheese, cover and let sit for 5 minutes. Serve with a nice green salad.

Enjoy!!


Saturday, October 8, 2011

Meeting The Galloping Gourmet, Graham Kerr


Port Angeles, Washington is having their annual Dungeness Crab Festival this weekend and Graham Kerr, The Galloping Gourmet, was invited to be the main speaker. I wasn’t sure if I wanted to go because I knew it would probably be crowded and me being short, I probably wouldn’t be able to see him.


Taken from my cell phone - blurry!
I ended up going and it wasn’t as crowded as I thought, but I was having a hard time seeing the front. Graham was going to be on stage, but the early speakers were on the floor, which was hard to see. As I’m waiting and trying to find a good spot, I noticed some people had 2 of Graham’s books. I thought to myself that I wouldn’t buy them because they’re probably too pricey. I ended up finding a great spot off to the side of the stage and was able to see him - I couldn’t see him doing things on the table, but generally, I could see him, and that was all that mattered to me.

He talked about his wife Treena and how he helped her after she had a heart attack and a stroke. He totally revamped his way of cooking to benefit her and he said that there is no way she can get another heart attack or stroke with the way he’s been cooking for her. He started to grow his own foods and talked about eating more whole foods. "Eat more plants, grow more plants, share with others . . . gather with your neighbors." He also said, "We need to do less harm to our soils and water." He talked about “not putting all your eggs into one basket because they will break  keep them in an egg carton. They can bounce all around in the egg carton and they will not break.”

His mantra is: Eat, Grow, Gather, Share

The first letters in each of those words spell EGGS. In January, he is going to start an Egg Carton Club. It’ll be an online site where people like us can go and share things about food.

He promoted his books for sale. It is normally $27, but for today, it was by one get one free for $20. I figured that this was a once in a lifetime chance for me and the price was pretty reasonable for TWO books, so I went and purchased them. The lady that helped me said that Graham would be signing the books after he was done on stage.

When cooking, he said that if you take something out (like fat), put flavor in - lots of flavor. He likes to use olive oil I Can’t Believe it’s Not Butter - it is a very healthy replacement for butter or other spreads.

He made for us a sauce with some parsnips. He used parsnips, evaporated milk, some water and a little salt. He chopped the parsnips and boiled them, put them in a blender with the milk, added a touch of water and the salt. He let that puree for 3-4 minutes. He told us that he created this sauce by accident while talking to a friend on the phone. Just as he turned on the blender, his phone rang. He left the kitchen and closed the door so he could hear. After 4 minutes of talking to his friend, he remembered his sauce and told his friend that he had to go because he had something he had to tend to and when he went back to his sauce, it was smooth and glossy - how sauces are supposed be.

After making the sauce and telling us the story, he demo’d how to make an omelet. He used 2 oz. of Southwest Egg Beaters and 1 whole egg, put it in a pan and moved it around with a fork. When it was still slightly runny, he added his filling - peas and some parm cheese. He was given some lavender pepper last night from someone local and was very pleased with it and he used that in the omelet. He showed us how to get the omelet out of the pan and poured his parsnip sauce over the top and added some smoke paprika and more cheese. He had someone from the audience who’s never made an omelet before come up to the stage and he walked her thru making an omelet. The omelets were passed around, but I didn’t get any - they passed out forks while I went to purchase the books, I missed out.

At the end, he talked about spending less time watching TV and more time with our families and neighbors. He closed by teaching us sing a song - I don’t remember the words, but it was a great way for him to close the show. I wasn’t sure if I wanted to stay for the signing because it was already 12:30, I hadn’t eaten lunch, and I didn’t go to the Farmer’s Market. But as I passed the line for signing, it wasn’t that long, so I decided to wait. The line went pretty fast and when it was my turn, he started chatting with Treena, his wife so I didn't get his full attention. I was kind of bummed, but he did say that he liked my name and after signing both of my books  I asked if I could take his picture and Treena said, “Let me take both your pictures.” She had a hard time with my cell phone camera and I had to help her out. After taking our picture, I said it was nice to meet him and I left. I wanted to say more, but his attention was with Treena.

It was very cold and after standing in the outdoors for an hour, my teeth were chattering while walking back to the car. I did go home for a quick bite to eat, then I rushed to the Farmer’s Market which closed at 2pm and it was already after 1. But, despite being cold, it was a rather nice day - I got my shopping done, I got to learn how to make a new sauce, and I got to meet a celebrity chef - how cool is that?

2018 update: Sadly, Treena Kerr died in 2015. Graham Kerr still comes up here for appearances.


Thanks for reading!!!