Thursday, June 30, 2011

A Real Coupon Holder

The one I made a few days ago was a little too small so I decided to make another one that was bigger. I also thought about putting in dividers that can't come out, so I came up with this idea.


Basically, on the inside, I made open bottomed pockets. It creates enough of a divider and, it actually works. I have 3 sections: food, toiletries, and everything else. I don't have to worry about the coupons slipping under because it's only paper. It looks pretty good, don't you think? The dividers were done on an impulse and I think I did pretty well.


Here's how the whole thing looks - pretty much like the other one:


It measures about 6-3/4" x 3-3/4" - still small enough to throw in your bag. I made it in a solid color so that it wouldn't detract from your bag. I think it's pretty neat.

What do you think?


Tuesday, June 28, 2011

A Random Rose


I have 2 rose plants that are growing nicely - had 3, but 1 got sick and died. Well, in the vicinity of where the 2 are growing, this one started growing. I did not buy this, I did not plant this - it just started growing and now here it is, there's even another one. How cool is that?


Comments are appreciated. It helps me to know whether I’m on the right blogging track or not.

Saturday, June 25, 2011

Coupon Holder

Would also make a cute coin purse

I love coupons, but most times I cut them out and forget them on the dining table. I will go shopping andrealize I forgot them at home. I have the best of intentions, but I forget. Or, I'll put them in my bag and they will get torn or ripped (like the larger one in the pic) before I can use them. I have been known not to buy an item (unless I really need it) because I know I have a coupon at home (kinda silly, but that's me).

I decided to make a coupon holder, most of the ones you see are really big, this one is about 4" x 3" - not too big to slip into my bag and I won't be tearing up any coupons. It's just a basic zippered pouch that's very simple to make. I made this with a solid fabric and added some machine stitching for added interest. These are simple and cute, and would make great coin purses as well.


Comments are appreciated. It helps me to know whether I’m on the right blogging track or not.

Tuesday, June 21, 2011

Spinach Fandango Recipe


**I am sorry - the pics for this post was accidentally deleted and cannot be retrieved**


Before we got married Jim used to live with this older lady and her 2 adult daughters. The lady’s name was Ivy Valle, but we called her “Ma Valle”. She used to make this dish and it was very yummy and easy to make. I have since modified it by changing the soup from cream of celery to cream of chicken - I think the chicken soup tastes better. I now make my own my own cream of chicken soup - I’ve eliminated a lot of salt and unecessary junk. This casserole is great with a green salad and garlic bread. Really easy if you’re having company or for a pot luck. This recipe is a 2fer (2 recipes in one) as I give you the fandago recipe as well as the cream of chicken recipe.

Easy Cream of Chicken Soup

6 Tb. butter or oil
1/3 c. gluten free flour or arrowroot
1/2 c. dairy free milk 
1/2 c. canned coconut milk
3 c. chicken broth/stock
1 c. finely chopped cooked chicken (roughly 2 chicken thighs)
Pepper

Melt butter in pan, add chicken and blend in flour. Add milk, cream, broth and pepper. Cook & stir until it comes to a boil and thickens. Take off the burner and process soup with an immersion (stick) blender - take it as far as you want, chunky or smooth. If you don’t have an immersion blender, you can put the soup in a regular blender. Just be careful if soup is hot - put a kitchen towel on top of the blender and hold down while blending, the heat could cause the soup to explode. Cool and set aside.

This soup will make more than you will need for the fandango recipe. You will have enough to make another dinner. Just add more chicken if you like with the veggies of your choice and make some grilled cheese sandwiches for an easy dinner.

Spinach Fandango

1 lb. ground beef or turkey (could use Italian sausage - would give a different flavor)
2 pkg. frozen chopped spinach, thawed and drained real well
1 pkg. mushrooms
10 ¾ oz. cream of chicken soup (the original recipe uses 1 can of Campbell’s Cream of Celery Soup)
1 c. dairy free sour cream
2 c. dairy free cheese or any desired cheese
Oregano (optional)

Brown meat. Remove from heat let cool, then place in large bowl with the other ingredients and some of the cheese. Mix well and pour into a 13 x 9 pan that’s been covered in foil and sprayed with oil to prevent sticking. Cover with the rest of the cheese. Bake at 350 degrees until cheese is bubbly. Can place under broiler for 3 minutes to brown the cheese.

Enjoy!


Comments or questions are always welcomed. I would love to hear what you think of this recipe or any of my other posts. Thanks!

Monday, June 20, 2011

Easy Strawberry Sauce Recipe

Yummy!

Yesterday was Father's Day and in honor of that, I made this cheesecake (using gf ginger snaps for crust). In the past, I've made the NY style cheesecake & it was so dense that my daughter & I could only eat 1 piece of it. While at our favorite restaurant T's, in Port Townsend, WA recently, we had this cheesecake that was so light and creamy. While this cheesecake isn't as light, it was not as dense as the NY one I used to make. I decided that this needed a sauce, so I decided to make a strawberry sauce for it. I always have frozen strawberries in my freezer to make a quick frozen dessert and made this very simple sauce.

1 c. of frozen chopped strawberries
1 tb. plus 1/2 of 1 tb. of sugar

I sprayed some oil in a small sauce pan and placed both ingredients in. I cooked the strawberries down till they were soft. I removed the pan from the heat and used an immersion blender to blend the strawberries till the consistency I liked. I chopped 1 fresh strawberry and mixed it in. Lemon juice can be added for extra flavor. This can be served cold or warm.

The amount of sugar made this sauce not too sweet. This recipe could be doubled and can be used on ice cream or chocolate cake as well.

Enjoy!

Wednesday, June 15, 2011

How to Prevent Knots and Tangles When Prewashing Fabric


**I am sorry - the pics for this post was accidentally deleted and cannot be retrieved**


For anyone who sews, quilts or works with fabric, prewashing is a must unless you’re making something small and it doesn’t matter. I can’t tell you now many times I’ve prewashed a bunch of fabric together only to have the edges frayed and tangled up in knots in the washing machine. Lately, I've been dreading prewashing because I know things will end up in a tangled mess. I have tried to zig zag the edges. It works, but it takes time to zig zag a large piece of fabric. Serging would work too, but that too takes time. I'm kind of impatient when it comes to stuff like that.

Yesterday, I bought a bunch of fabric - I had a mix, about 3 fat quarters, some ½ yards and 4 full yards. I was thinking, “How can I avoid the dreaded tangled mess that I always get with prewashing.” So I Googled on how to prevent fraying while prewashing and I kinda put several findings together and it worked. Here’s what I did:

Cut about ½” off each corner, I used my pinking shears - helps to prevent fraying.
• Put very little laundry detergent into your washer and turn on the cold water.
• Open up your fabric and place in washer evenly.
• Stop the water when all fabrics are thoroughly submerged (what frays the fabric is the agitation of   the washer).
• You want to gently swish the water - because I’m short, I use a dowel to help with clothes in the washer and I use that to gently poke and move the fabric around. You can use your hand.
• Let everything soak for about 20 minutes (set a timer so you don’t forget!).
• After 20 minutes, turn your washer dial to rinse - letting the machine rinse and spin your fabric.
• When complete, throw your fabric in the dryer and dry as usual.

I had a good amount of fabric, like I said - of different cuts, and I only had 1 tangle and some fraying - nothing knotted up. I was pleasantly surprised. The only deal with my method is that you will have to be present to do the steps I did - you can't turn it on and go shopping. So, next time you have to prewash fabric, give this a try and see if it works for you.

**Note: This post was originally written several months ago. The above pic was taken today.**

Tuesday, June 14, 2011

Warm Asian Chicken Coleslaw


**I am sorry - the pics for this post was accidentally deleted and cannot be retrieved**


I made a real easy dinner tonight. I used this salad dressing, boneless chicken, bag of coleslaw mix, and some scallions. It came out pretty good.

First you make the dressing and set it aside - a good tip is to make it in a small container with a lid so you can shake it to combine all the ingredients easily. This salad dressing tastes almost like the kind you would get from a Japanese restaurant, it's pretty good - I couldn't find my sesame seeds tho, so there's none it this salad. Then I took some boneless, skinless chicken thighs and breasts, cut them up into bite sized pieces and sauteed them till no longer pink. I added the bag of coleslaw mix and using tongs, I mixed until the coleslaw was starting to get soft. I poured all the dressing and mix thoroughly until the coleslaw was nice and wilted. I also added some scallions or green onions for interest. Serve hot or at room temp.

Enjoy!


Comments or questions are always welcomed. I would love to hear what you think of this recipe or any of my other posts. Thanks!

Monday, June 13, 2011

Cooking Tip

Whenever you are sautéing or frying foods, you are always left with little brown bits, called fond, in the bottom of your pan. That fond is like gold and contains extra flavor. If you are making a sauce or gravy, normally, you would put oil or butter in the pan and you would scrape up the fond as you are stirring in some flour. Well, even if you are not making a sauce you will always have some of the fond left. If you were to leave that in the pan after your meal was over, you would have some crusty stuff to scrub because the fond would have solidified - especially since we usually don't wash the pan immediately after cooking. Instead, after you remove the item you just sautéed, immediately put in about 2 tablespoon of chicken stock or broth (you can even use water) and start to scrape up the fond. As the fond is being scraped up with the little bit of stock, it will mix together and turn brown. After all the fond is gone from the bottom of your pan, pour the sauce over your dish. Even if you don’t have a saucy dish, that extra bit will add some good flavor to your food. It works really well with eggs, just put a touch of stock in the pan and scrape around the eggs, that little bit will mix in with your eggs. Another benefit of doing this is that you will end up with a pan that is very easy to clean because the fond didn’t get a chance to solidify in your pan.

I do this all the time and today, I did that with bacon. I sautéed some bacon for a pea salad and was left with some brown goodness in my pan that I didn’t want to waste. I put in about 2 tablespoon of chicken stock. The pan started sizzling and I started to scrape up all that goodness. When the fond was incorporated with the stock, I poured the extra bit of flavor into my salad - it was very tasty and my clean up was effortless.

Wednesday, June 8, 2011

Large Pursellet

This is my small pursellet that I designed several years ago and has been my go to wallet. It is a wallet and coin purse. It holds all my cards (I have over 18 different cards - no credit cards!) and my bills plus my coins. The bills have to be folded in half in order to fit inside. For a while, I’ve been wondering about making a pursellet that could hold bills that didn’t need to be folded. Well, someone else saw this and had the same thought, so I decided to make a larger pursellet and it took me 5 tries until I finally got what I wanted.


Here is the first attempt. It measures 7 ¼” x 4 ½”. The card pocket wasn’t long enough for the cards to be placed side by side.


The second attempt - measures 8” x 4”. The cards could not fit into the pockets, I had to make the pursellet bigger.


The third attempt - measures 8” x 4 ½”. I made it bigger, but messed up on the pockets. I ditched it, which is why it’s unfinished. I was trying to make the card pocket so the cards went in head first.


The fourth attempt - measures 8” x 4 ½”, I got the pockets right and everything fits! The cards go in head first and there’s plenty of head room to zip it up. As I was doing the final touches to it, I realized that it is fairly large - not sure if someone would want to carry around something that large, so I redid it again.


Tada!! The fifth and final try - measures 7 x 4 ½”. This is perfect, not too big and not too small and I can get everything I want in it. I could probably put my cell phone in there too along with the coins.


Here are other pics to show off it's details:

Card pocket: left side has 12 cards - right side has 6 cards


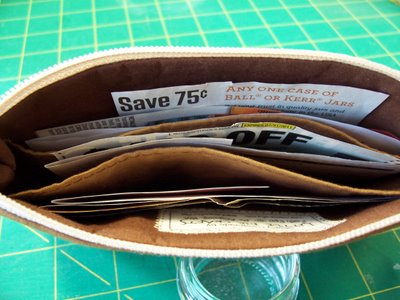
Unfolded bills and coins


Boxed corners make the inside roomy


Hand painted bead helps to make a nice zipper pull


**Check out what others are saying about my Pursellet here.


Here's a comparison between the small and large pursellet so you can see the difference:

Small is 6" x 3-1/2"/Large is 7" x 4-1/2"
 

So, after about 4 days of thinking and reconfiguring, I have a large pursellet. I need to make more because these will definitely be up for sale - but first, I need to go buy more zippers!

Tuesday, June 7, 2011

Awesome Dinner


Just made an awesome dinner. It's called Greek Meatza with Creamy Feta Kalamata Olives and Red Onions I took it and put my own spin on it. It's basically a pizza with ground beef crust and it is sooo good. I made the "crust" same as the recipe, except I used fresh oregano.


Before cooking


When I first spread the meat in the pan, I thought it was too much. I initially was going to use only 1 1/2 pounds of ground beef thinking it was going to more than I wanted, but it shrinks by about two inches on each side - pretty cool to see the transformation. Spreading it thin does help it to cook fast - 12 minutes is how long I cooked mine.

For the "topping", I took two roma tomatoes, sprinkled garlic and parsley with a coating of olive oil, and roasted the slices at 425 degrees for 20 minutes and set aside to cool. I used regular sweet onions instead of red - I sliced them thin and sauteed them with some regular shrooms till they were carmelized then put them in a bowl to cool. I bought kalamata and green olives - some of the greens were stuffed with gorgonzola blue cheese - I cut them in half. You can use regular black olives, but the kalamata and the green's saltiness adds great flavor. I also bought two 3.5 ounce tubs of feta cheese.


I took the tomatoes and cut them up and put them in bowl with onions and shrooms. I added 1 tub of feta cheese and mixed thoroughly. In the meantime, the "crust" is baking in the oven. After baking, I scraped off the guck and poured off the excess grease. I topped the meatza with all the wonderful toppings and broiled as instructed.


I made a simple green salad to go with our dinner and it was very tasty. This will be a repeated recipe in my house and either using Mark's recipe or my spin off, I believe you too will love this recipe.

Enjoy!


Sunday, June 5, 2011

Gardening Scare

Mr. Frog

Yesterday, I bought some strawberries to plant in my strawberry planter. I was using this potting soil which I had opened about a couple of weeks ago and had it laid on top of another bag of potting soil. I had the opening partially closed with some branches. I was using a small 4” round pot as a scoop to get out the soil and place in the pot. There are about 12 holes in the pot and I was on the 4th or 5th hole when I scooped out this frog! It scared the crap out of me. I immediately dropped him (I’m surprised I didn’t scream) and I got up and ran upstairs where Jim was eating his lunch to tell him. My heart was racing and I had that creeped out feeling. I told him that I would wait for as long as it took for him to go down and remove the frog and see if there were others in the bag - I was prepared to just leave everything as is and go do something else. He was done with his lunch and kindly went down to take care of Mr. Frog for me. He tried to catch it, but he got away. I don’t know how he got in the bag or if he came in the bag, but that was something I never want to go through again.

Thanks for reading.


Comments or questions are always welcomed. I would love to hear what you think of this post or any of my other posts. Thanks!

Saturday, June 4, 2011

Save Your Crumbs!

Do you throw out the crumbs from your chip or cracker bag? Well, stop! You’re missing out on some great flavor. I know how it is when you get to the bottom of the bag, it’s hard to eat, everything’s in crumbs and the flavor is usually very strong. Instead of throwing it out, crush them up into even smaller crumbs and use that as a substitute for bread crumbs. For my dinner tonight, I just took 2 different flavors of Kettle chips plus carrot chip crumbs and crushed them up and put them in meatballs. It works really well and adds great flavor.

When my girls were growing up, I used to take Goldfish or cheese Nips crackers and crush them up and used it as breading for chicken. When using as a breading, coat in egg whites first then coat with the chips - low fat mayonnaise also works as a breading base. I’ve even coated fish with crumbs, and if you broil it for about 2-3 minutes before serving (watch that it doesn’t burn), the chip coating will get crunchy.

This works great as replacement topping on a casserole that usually calls for bread crumbs. It will still get crunchy plus it will have better flavor from the chips or crackers instead of plain bread crumbs.

Save the different flavored crumbs and combine them all to create a new flavor - I store mine in the freezer in a large zip bag and just add to it. This is so simple and nothing goes to waste. Just remember that chips and crackers are usually salty so adjust the salt in your recipe (I didn’t add any). So next time you get to the bottom of your chip or cracker bag, don’t throw it out - save it!