Monday, January 23, 2012

ONE BOWL Chocolate Chip Cookie Recipe

Back in September, I remade a great chocolate chip cookie recipe. Well, I can never leave well enough alone and remade it again, only easier. Actually, I did this by mistake. I always get 1 cup of butter mixed up with 1 stick of butter and one day when I was making this recipe, I accidentally used 1 stick instead of 2 (1 cup of butter equals 2 sticks). I even fidgeted with the flour measurements so it was easier to do - just 1 cup of each flour.

Since then, this cookie has been very popular and I even made a bunch to pass out this past Christmas. I renamed it because as I was making the cookies that day and getting confused with the butter measurements, I accidentally threw the flour after creaming the butter with the honey (usually, the dry ingredients go into a separate bowl). I was sure the cookies were not going to turn out but, to my surprise, the recipe came out great. I love these happy mistakes - especially when they turn out delicious!


ONE BOWL Chocolate Chip Cookie

1 c. softened Earth Balance, butter, or coconut oil
3/4 c. honey
2 eggs at room temperature
1 tsp. vanilla extract
1 c. brown rice flour
1 c. arrowroot powder
1 tsp. xanthan gum
1 tsp. baking soda
½ tsp. salt
1½ c. dark chocolate chips
½ c. pecans or nuts of choice
1 - 2 tb. flax meal (optional) - my addition

Preheat oven to 375 degrees. Line baking sheets with parchment paper and set aside. Beat butter until creamy, then add in brown sugar and granulated sugar and beat until well combined. Add in eggs, 1 at a time, then the vanilla and beat until incorporated. In the SAME bowl, dump in flour, arrowroot powder, baking soda, and salt. With your mixer on low, mix the flour and butter mixtures together a little at a time, and slowly process until they come together. Stir in the chocolate chips and nuts. Using your 1 tablespoon measure (or a small cookie scoop), place 1 tablespoon on your baking sheet about 2 inches apart. Bake cookies for 8 to 10 minutes until set. Place cookies on a cooling rack to cool, then enjoy!

Now there are 3 ways you can make this one cookie, the way Shirley Braden made them, my first take on this recipe and this new version. Either way you make them, I guarantee you'll like them as much as I do.


My 1st take is on the left and the new ONE BOWL cookie is on the right


Happy Baking!!!!

Comments or questions are always welcomed. I would love to hear what you think of this recipe or any of my other posts. Thanks!

Thursday, January 19, 2012

Paula Deen

**This was not meant to be mean, I'm just disappointed**

Everyone knows who Paula Deen is right? The Queen of butter and all foods fried. Well, just recently, she announced that she has Type 2 Diabetes and she's had it for 3 years and have kept quiet until now - now that a pharma company has made her the spokesperson for their company. There is a HUGE scuttlebutt online regarding this. People are saying that Paula should've used this 3 years ago, when she 1st found out, to turn things around - diet wise. Instead, she kept promoting butter and fried foods which we all know is not good for a healthy person, let alone a diabetic one, and she jumped on the pharma wagon. We all know that with the proper diet, diabetes can be turned around and possibility eliminated, but Paula took the easy way out.

I’m going to throw my hat in the ring too and say that I am disappointed in her. I was noticing in the past 3 years that even tho she was still cooking with butter and putting forkfuls of her Gooey Butter Cakes in her mouth, that she had adopted Rachael Ray’s mantra of “eating in moderation”.  In these past 3 years, she could’ve been a great role model and turned things around. She could’ve retired her butter crown, changed her TV show and showed us all a better way of eating healthier. Instead, she continued on her quest of being the butter queen. In fact, she has stated that she doesn't plan to change her cooking format on TV. She keeps pushing "eating in moderation", but doesn't being a type2 diabetic mean you have to change your way of eating, not just "eating in moderation" - a lot of what she's cooking, she shouldn't even be putting in her mouth, and  you always see her taste testing her food on TV. To me, this is a poor example of a role model. She keeps saying that she doesn't eat like that at home, but we don't see her home life, we just see her on TV - eating her high calorie dish that she just made. 

Her son, Bobby, recently started a new show on the Cooking Channel called, “Not My Mama’s Cookin’”. Here, he is taking all of Paula’s high fat, butter ladened dishes and making them lower in fat and healthier to eat. Just think if Paula did this to her show - she’d be a hero to many people, me included.

I used to love Paula and her simple way of cooking. I have taken many of her dishes and suited them to our way of eating - replacing the high fat with suitable ingredients. I loved watching her show and watching her family on TV (her hubby, Michael, is a sweetheart). She has disappointed me and probably a lot of you with her recent actions and I probably won’t be watching her shows anymore. For these past 3 years, she's lied to us about eating what she's been cooking. She kept us fooled by saying that she doesn't eat "this way" all the time. Paula should've been up front from the beginning, then there wouldn't be a lot of this negativity that people are feeling. Don’t get me wrong, she is still a nice person, but just I don’t agree with how she's handling this.

Here is something I found this morning online regarding Paula Deen - which stirred this post.

Anyways, enough of that.


Thanks for reading.

Comments or questions are always welcomed. I would love to hear what you think of this post or any of my other posts. Thanks!

Wednesday, December 14, 2011

Crystallized Ginger Recipe


  Ginger is a rhizome or root of the ginger plant. It is used as a spice in cooking and baking, it has a bite to it that is a little spicy, and is used frequently in Asian dishes. Ginger is the cousin to turmeric and cardamom. Most notably, ginger is used in candied form to aid in digestive issues. It is excellent in relieving nausea and stomach discomfort. The flower is used widely in Hawaii to make leis - a flowered neck garland. It is a very delicate flower and smells real sweet.

Almost a tablespoon of ginger in the bottom of the bag!
Many natural food stores sell crystallized ginger and the cost can be pretty pricey. Crystallized ginger is basically cooked in a sugar syrup and then coated in sugar. The amount of sugar used for the coating is too much for me. A lot of times, I taste a lot of sugar instead of ginger. What I have been doing recently is scraping off the sugar as I am taking a piece of ginger out of the bag - it helps, but I still taste the sugar. Several months ago, I tried making my own crystallized ginger and it did not come out. The ginger didn't candy right and it all stuck together and was hard - maybe I didn't cook it long enough.

I've been wanting to try making it again as I have been eating a lot of crystallized ginger (I like the taste and it satisfies my sweet tooth in the evenings). I recently saw Daphne Oz (Dr. Oz's daughter) on The Chew and she made candied citrus peel. The segment was real quick, no real demonstration, but her explanation was so easy, I decided to try it with ginger - and it worked. I am very pleased with how it turned out.

Here is how I did it. I bought a huge chunk of ginger root - it was $3.99 a pound and I had just under a pound (sorry, I didn't get a pic of that huge root before I cut it up). Make sure the ginger you buy is not wrinkly and soft (that means it's old) - the one I bought was firm and thick.

I cut it up in manageable pieces and used the edge of a large spoon to scrape off the skin (which is not edible). I tried using a vegetable peeler, but it took off too much ginger, so I stuck with using the spoon. **Update** I figured out that if you peel the ginger like a potato - use a small spoon and flick the skin away from you, into a sink that has a trap to catch all the peel, the peeling process goes a lot faster. If you use more wrist action, you will have less wear on your fingers and joints.


All peeled and ready to be sliced. The peelings are thin and do make a mess.


This is what I used to get even slices. If you don't have a slicer, you can use a sharp knife and cut into thin slices.


I started out using this large skillet. I put in 2 cups of filtered water and 1 1/2 cups of sugar. Your basic simple syrup recipe is 1 cup sugar to 1 cup water - I wanted less sugar.


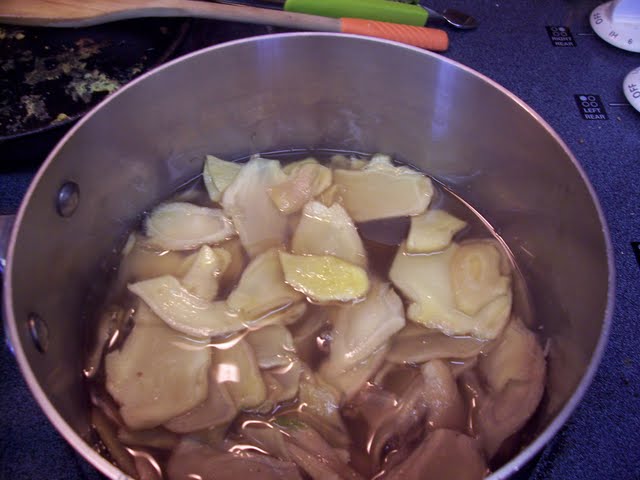
After the sugar dissolved, I decided that the cooking surface area was too large, so I dumped the sugar mixture into a large sauce pan. I added the ginger and mixed everything. I set my timer for 2 hours. **Update** I have since updated this whole process - check it out here.


In the middle of the cooking time, I decided to strain out the bits of peel, so I alternated between the large skillet and sauce pan to strain the sugar syrup (I have a metal tea strainer, which worked great for this). 


After 2 hours, I put the candied ginger into a large strainer to remove the excess sugar syrup.


I put the ginger onto a foil lined cookie sheet and sprinkled about a tablespoon of sugar on top. I wet my hands (so nothing would stick) and coated the ginger with the sugar. 


I placed the ginger pieces onto a cooling rack, some went directly on the foil, to set up.


There was hardly any sugar left on the bottom of the cookie sheet after all the sugar was coated on the ginger.
If perchance your ginger is "wet" and sticks together, place your slices on a cookie sheet in a single layer and bake at 200 degrees for 1 hour. Your ginger should not clump up when done - a few that stick together is ok.

The taste is really good, you get that ginger bite you expect from ginger, unlike the store bought kind where you taste more sugar and less ginger. I really like it and plan to never buy crystallized ginger from a store again. Oh, and the leftover ginger sugar syrup . . . I plan to use it the next time I make turmeric milk.


Please give this a try I really think you'll like it as much as I do.


Ginger simple syrup


Thanks for reading!!

Comments or questions are always welcomed. I would love to hear what you think of this recipe or any of my other posts. Thanks!


Monday, December 12, 2011

My Turmeric Milk Recipe

**I am sipping some right now as I write this post.**  Turmeric is a very healthy and important spice to have in your arsenal. It is anti-inflammatory, antibacterial, and can be used in many ways. Lately, there have been numerous reports on the Internet about tumeric and it's great healing properties. Turmeric is also known as curcumin, which is the active ingredient in it.

I never knew about this powerful spice until last year when my daughter Dawn came home for a visit. We we shopping at WalMart and she bought a bottle of turmeric. I asked her later what she had bought it for because we weren't cooking anything that would require that spice. She said that turmeric has great healing properties and she was making tea with it. Well, months go by and on Facebook a lot of blogs that I follow were posting about turmeric and how great a spice it is. BTW, always buy your spices at a store that sells them in bulk (natural food stores), those are fresher and are rotated constantly by the people who buy them, and you can buy them by the ounce. The spices in your grocery store have been sitting there for who knows how long and you have to buy what you see.

This is what turmeric looks like. It looks very similar to ginger root, except it's a pretty orange color.

The first recipe I ever came across is from Lexie's Kitchen (update: link is broken). I really like that she tied turmeric to Hawaii (where I'm from). Her blog post talks about how turmeric or 'olena as the Hawaiians would say came to Hawaii.  Her recipe is fabulous and worth trying - this really got me hooked into this awesome drink.

Another blog post is from Mark's Daily Apply. This is another blog I follow and he includes other recipes you can make with this wonderful spice. Mark uses real ginger and adds cayenne instead of using peppercorns.

Well, since making this milk for months now, I have come up with my own recipe. I use almond milk (original flavor), but you can use whatever milk you drink. I bumped up the ginger amount, because ginger is warming and I like it. I also increased the cinammon to a 1/4 teaspooon, another warming spice. I don't use a sweetener.

What I really like about this recipe is that it is caffeine free and can be dairy free if you use almond, coconut, rice or soy milk. On a cold night, you can drink this before going to bed and it will warm you up.

My success to this recipe is to constantly stir while the ingredients are being incorporated. If you don't stir, the spice will gum up be very thick in the bottom of your mug - you stir only for five minutes and it goes by real fast. Also, I tried to up the amount for turmeric to a full teaspoon and it didn't work, it was too much. You can also double the recipe like Lexie has done. Here is my recipe for turmeric milk:


You will need:

1 cup of almond milk
1/2 tsp. of turmeric
1/2 tsp. of ground ginger
1/4 tsp. of ground cinnamon
about 4-5 grinds of freshly ground peppercorns
1/2 tsp. of sugar or honey (optional) - I don't use any

Place all the ingredients into a small saucepan on medium heat and bring to a boil. Turn heat to low and simmer for five minutes, constantly stirring.

UPDATE 12/2018: I now use cashew milk - I have since become sensitive to almond milk and almonds.


After five minutes, your milk should look like this.


Pour into your favorite mug and enjoy!!


Drinking turmeric milk is great on days when you wake up to this . . . 


Stay warm my friends!!!

Comments or questions are always welcomed. I would love to hear what you think of this tip or any of my other posts. Thanks!


Wednesday, December 7, 2011

Sanitizing Your Kitchen Sponges

We all have some kind of sponge that we use to hand wash our dishes or to clean messes. After a while they get real gungy, and in my case, very stinky. I've always hated that after just a few uses of my sponges, that they get stinky - especially my meat sponge (the blue ones in the pic). I use my meat sponge to clean anything that comes in contact with raw meat (I even have a separate cutting board and knife for raw meat - you should too). My regular sponge (the white/yellow one) will often get gross and eventually need replacing.

If you don't fully squeeze out all the water in your sponges and just let them sit, they will get gungy and start to stink (I do that when I'm in a hurry). I have been getting tired of having to replace my sponges all the time - they aren't very costly, but still.

I recently read on the Internet about sanitizing your kitchen sponges using dishwasher cleaner - it has bleach in it, which makes the perfect sanitizer. There were no specific instructions, so I made up my own.

You will need:  your dirty sponges, a flat glass (or ceramic) container to fit all your sponges, and some dishwashing soap (rubber gloves if you are sensitive to bleach).


If your sponges are dry, get them wet and wring them out.


Put about 2 tablespoons of dishwashing soap into your flat glass container. Add about 1/2" - 3/4" of water and mix the soap into the water - wearing rubber gloves if you need to.


Place your sponges into the container, pressing to get some of the soap into the sponges.


Set your timer for 10 minutes.


After 10 minutes, turn sponges over and press to get the soapy solution all through the sponges.


Set your timer for another 10 minutes.

After that, rinse your sponges thoroughly and let them dry. Put your glass container into the dishwasher for the next run.

This is my second time doing this and I love it! No more gungy, stinky sponges. Some of the stains will still be there (because they're stains), but it won't be gungy - I promise. I plan to do this every 1-2 weeks depending on how my sponges look (and smell). So if you have gungy/stinky kitchen sponges, take a tip from me and sanitize them quickly and easily.


Happy Cleaning!!!


Comments or questions are always welcomed. I would love to hear what you think of this tip or any of my other posts. Thanks!