Sunday, February 10, 2013

A New Way to Cook Chicken

There are so many different ways to cook chicken and they all produce different results. We love chicken in our house, especially boneless skinless thighs. I have developed a new way of cooking chicken that I think is very tasty and the end result produces chicken that is cooked well with great flavor. Let's start shall we.

What I like to do first with my thighs is to clean them, see the beginning of this post which shows you how I clean my chicken. This gets off additional fat and that vein that's on the inside. No rinsing necessary.

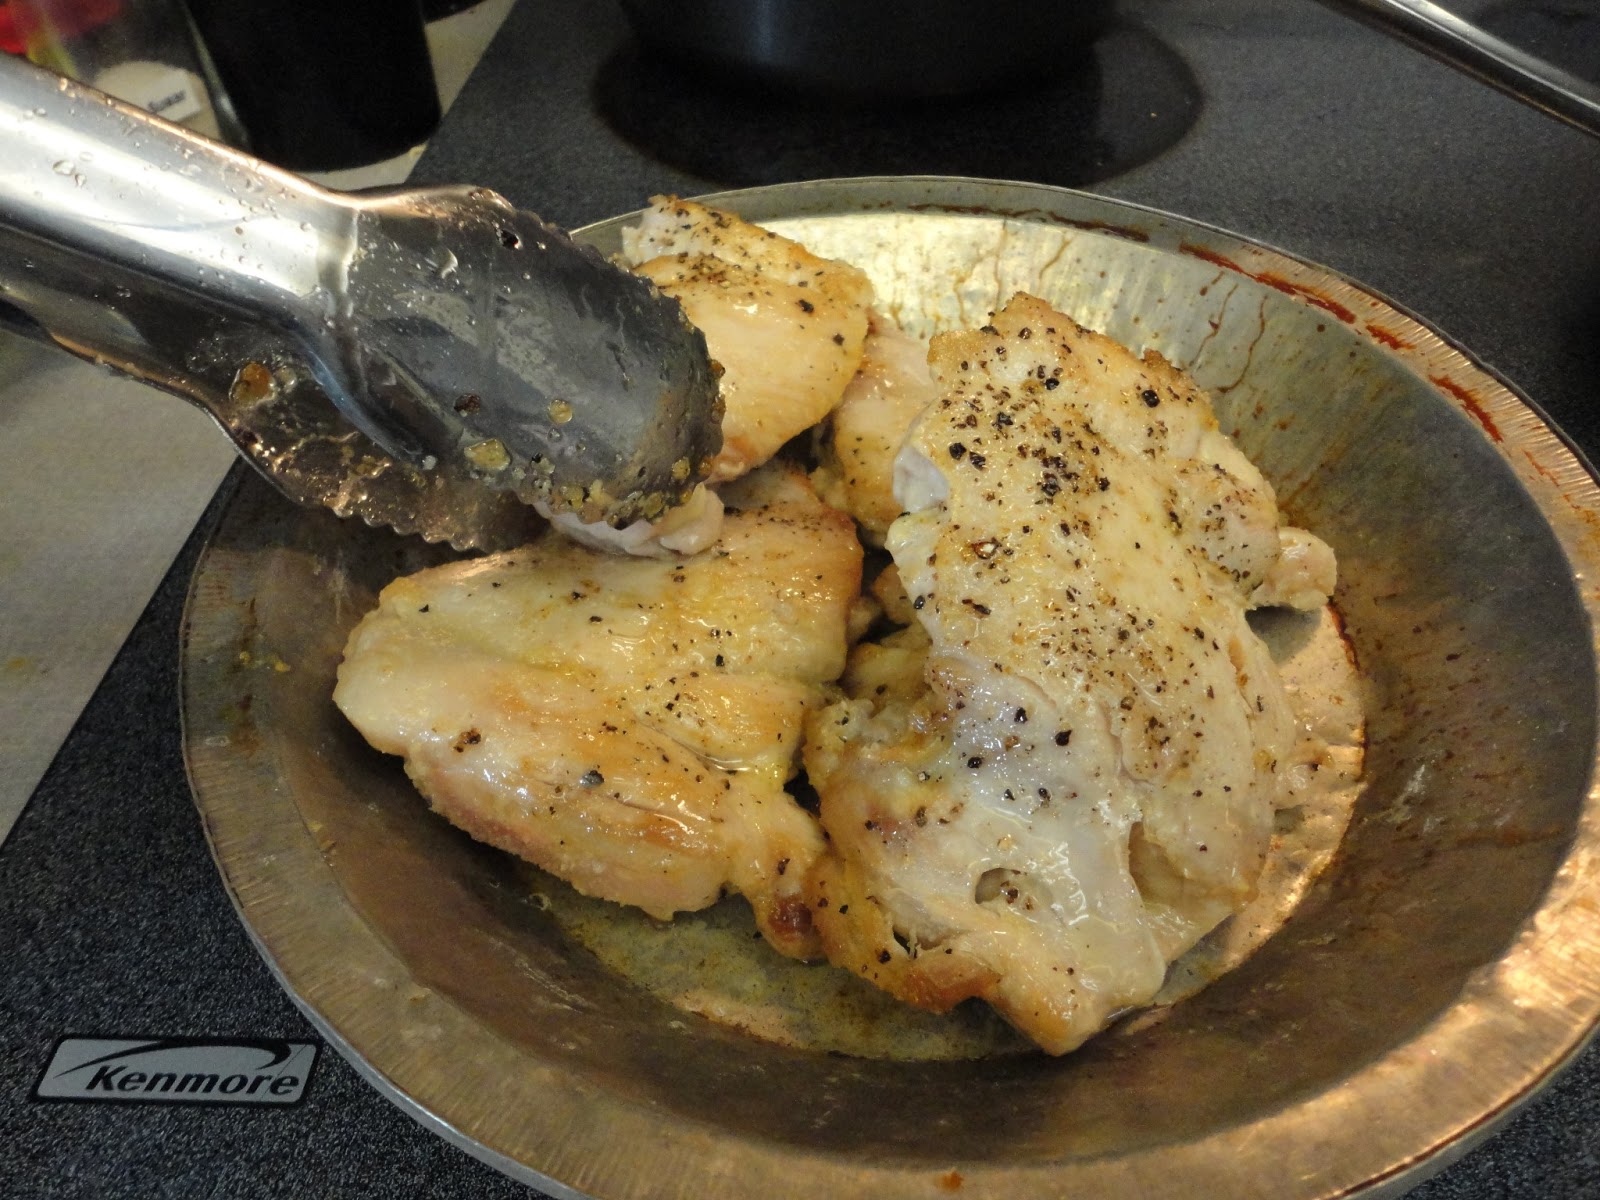
Next, add some cooking oil to a preheating skillet (I use extra virgin olive oil). The trick to my method is to have the oil HOT, not smoking, which will prevent the chicken from sticking to your pan (especially if you're not using a non stick pan). As I clean my chicken, I leave it on my chicken board (I have a designated board and knife for raw meats) and prep it for cooking. I lay them out and sprinkle salt, pepper, and a mix of granulated garlic and onion (to increase flavor) on one side. 


Place chicken flavor side down and don't crowd the pan, if you have a lot to cook, do it in batches or use another pan.


Immediately set a timer for 3 minutes or just eye ball your time by watching the clock. Then season the exposed side.


After 3 minutes are up, turn chicken over to cook the other side for another 3 minutes. It's ok if you get a little bit of stickage, if it totally won't lift up, then cook it a little longer.


When those 3 minutes are up, remove your chicken to a dish or plate - I use a pie pan. **Note: if you just wanted cooked chicken - for salad or sandwiches, you can cook your chicken for another couple of minutes on each side then use for desired recipe.**


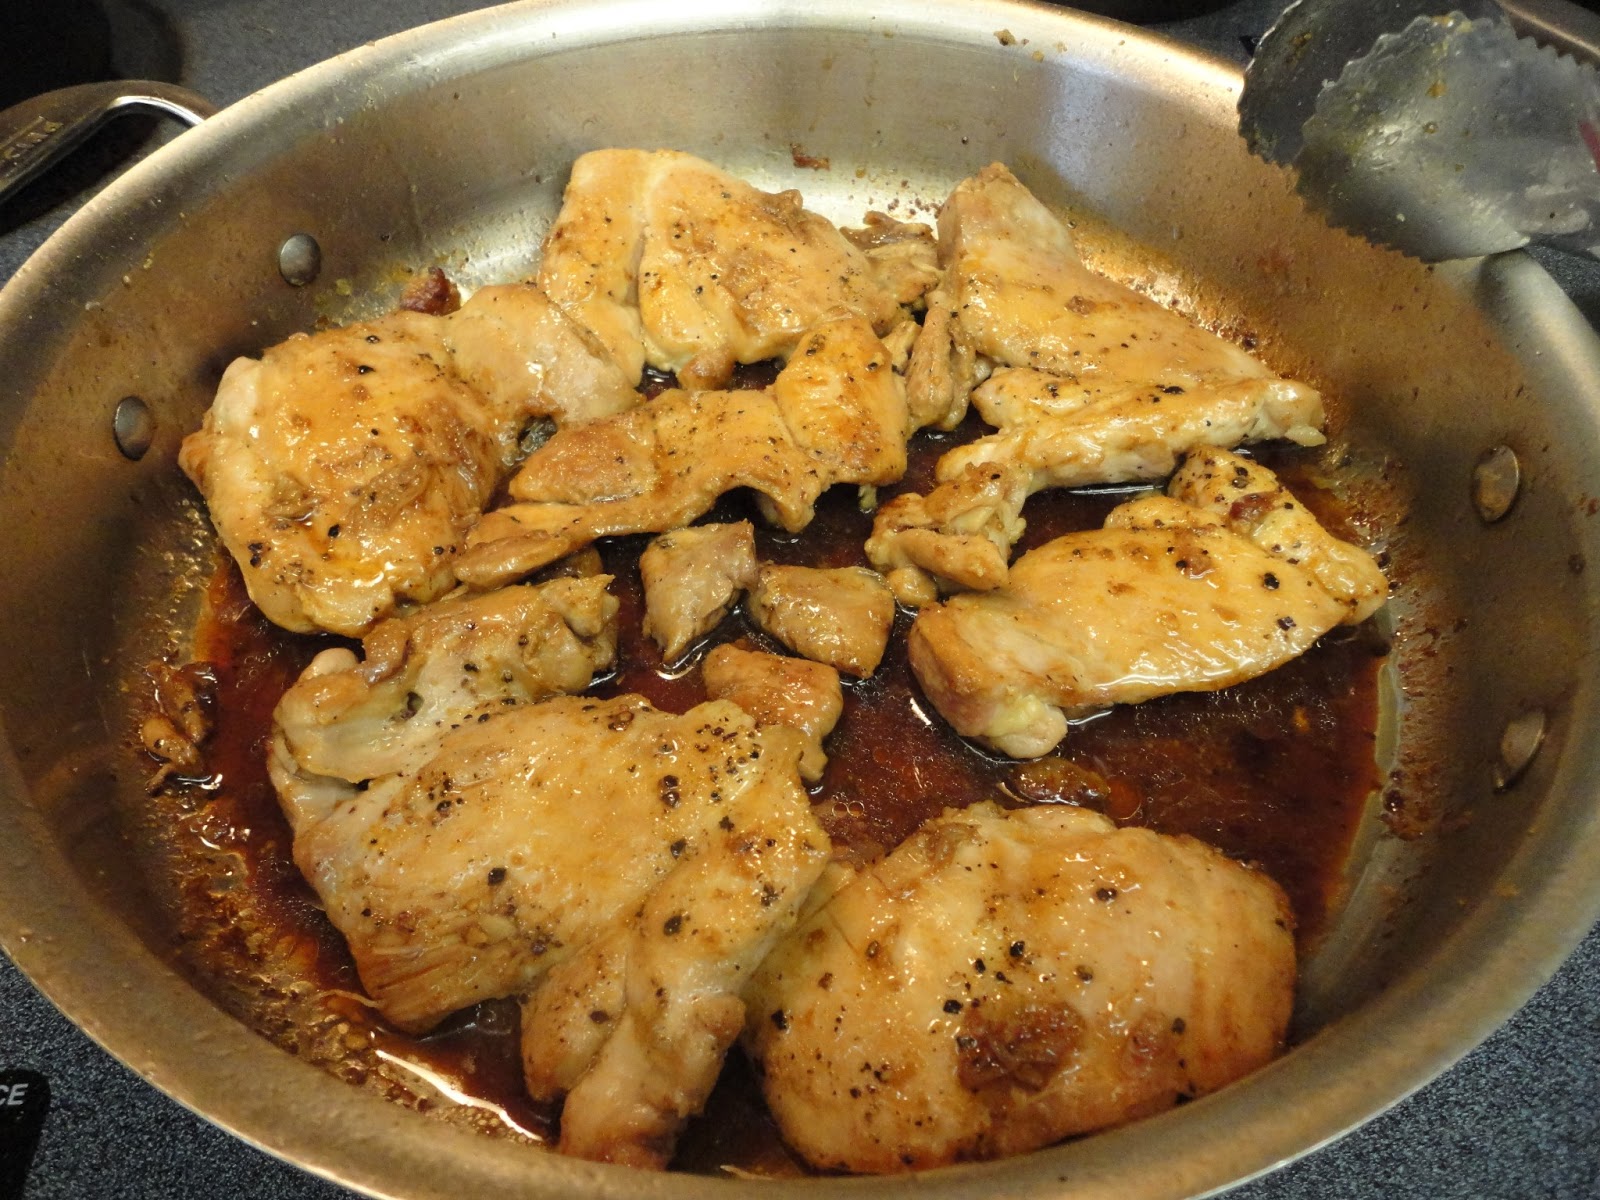
 Now you can have fun. Mix up whatever sauce you want - in this case I was making Shoyu Chicken. This is just a mix of soy sauce (wheat free tamari) and water in equal amounts. Here I did a 1/4 cup tamari to a 1/4 water.


If you are left with a lot of oil at the bottom of your pan, you'll want to take most of it out. I use a small mason jar to keep used oil - it's still good to reuse (probably no more than 3 times). You will be left with some glorious brown stuff stuck to your pan. All that stuff is gold, you want all that for extra flavor.


Pour in your sauce.


Let it heat up and bubble up some.


You'll want to scrape up some of the gold that's stuck to the pan. If you want a thick sauce, you can mix about 1 tablespoon of arrowroot or cornstarch in some water and mix in while the sauce is hot.


After things get loosened up and your sauce is hot, place chicken back into the hot sauce, turning to coat.


There should be some juice from the chicken left on your plate or pie pan, throw that in with the chicken too - that's extra flavor.


Cook for another couple of minutes on each side and you're done. 


Serve with sides of your choice - here I have quinoa, kimchi, and sauteed kale, it was delicious!


Cooking chicken this way has changed the way we eat chicken. Honestly, it tastes better than just dumping sauce on the chicken and throwing it in your oven or in a pan. It just takes a few extra minutes to get flavorful, juicy chicken. Along with Shoyu Chicken, I've done BBQ, teriyaki, adobo, and sweet and sour. Give my technique a try, and I promise, you'll never to back.


What's your favorite sauce you like on chicken?

Comments or questions are always welcomed. I would love to hear what you think of this post or any of my other posts. Thanks!


Sunday, February 3, 2013

Easy Fabric Dyeing - Part II

Ok, now that we've gotten the hard part out of the way, let's have some fun. First off,  if you haven't read Part I, I suggest you do, then you will understand what's going on here in Part II.

We'll start with mixing up some medium and paint.

You'll need a 20 ounce clean and empty beverage bottle, paint color of your choice, and textile medium. Working next to a sink, take your 20 ounce bottle and add some water to it - maybe a couple of tablespoons (about where my finger is at). 


Shake then open your medium and pour it into the bottle. Add some water and shake it up, you're trying to get all that medium into the bottle. Keep adding water, shaking, and dumping until the medium bottle is cleaned out. Repeat this same procedure for for the paint in this same bottle. 


After pouring in the paint, your dye will look streaked - just cap it and shake well to mix.

Now let's dye.

I had some fabric I dyed green a while ago and put it in my stash for a future project. If you want to dye a large piece like this, just use a large bowl or bin, pour the dye in and submerge your fabric. Leave it in for 20 minutes to half an hour, then wring it out (over the bowl) - pour the leftover dye back in the 20 ounce bottle for another use.


I ironed the fabric to remove any creases. Then I folded the fabric in half and start to fan fold - unlike folding origami, I didn't worry about being precise on my folds. 


I took a straight edged ruler and cut off the ragged edges on both sides.


Starting at the corner, I folded the fabric into a triangle. Turn it over and fold another triangle. Repeat until all folded. Again, I wasn't worried about precision with my folds.


I tried my best to keep the triangular shape. It will get real thick as you get toward the end - use clamps to help you hold it together.


I decided to use the circular acrylic shape - these were bought on Etsy.


I placed the circles where I DIDN'T want any dye - here, I just wanted the corners to be dyed. I sandwiched the fabric between the circles . . . 


Placed clamps tightly in place and set aside.


This part you can do in advance or at this stage. I took a scrap piece of  my working fabric and tested for contrasting colors. 


I liked the dark blue best - I poured it in a disposable cup and worked out of it.


I placed a screen over my sink and using a spray bottle, I spritzed the fabric with water. You get different results whether you dye with dry fabric or wet fabric - I mostly like to wet my fabric before dyeing.


Using a pipette, I applied the dye to the exposed areas of the fabric - the clamped areas will resist the dye. I don't worry about seepage under the acrylic, it will just add to the design.


Being sure to get in the folds of the fabric for an even design.


This is what the fabric looks like after removing the acrylic, you can see where the acrylic was (I did have some seepage). You could at this point open up the fabric a little to see if you like the design. Be careful if you do this - the fabric is very damp, and the darker dye can get on your finger which could transfer to unwanted parts of the fabric. I wash my hands a lot while dyeing.


I decided I wanted the top tip dyed, so I got some large tongue depressors, clamped them on, and applied more dye. 


What it looks like after dyeing.


Here is the finished fabric. You can see that the top tip I dyed was very uneven (that would be the centers of each diamond), so not all of it got dyed. If I didn't dye the top, I would've just gotten and all over diamond pattern.


Here is the stocking pattern I made years ago when I made our family stockings. I placed it on the fabric, cut out 2 pieces and sewed it.


Here is the finished stocking again.


Just to show you other dye patterns, here is the family of stockings - most of the lettering was colored in with gel pens. 


Here are other shirts I dyed recently - ice, pole and tied.


There are many ways you can dye fabric, I've just covered some of the techniques. The Internet has a wealth of information regarding fabric dyeing and like I said previously, you can use the same techniques in dyeing with paints as you could with expensive dyes and additives and it's cheap, cheap, cheap.

Give my tutorial a try and if you help, just ask me, I'll be glad to help where I can.

So, what's the first thing you're going to dye?


Comments or questions are always welcomed. I would love to hear what you think of this post or any of my other posts. Thanks!

Monday, January 28, 2013

Easy Fabric Dyeing - Part I

Fabric dyeing is not that complicated. Back in the '80's and '90's, there used to be a crafting show called Aleene's Creative Living - how many of you remember that show? It was a very informative show that taught all kinds of crafting mediums - there were featured guests who would demonstrate different crafts. One of the crafts featured was on fabric dyeing - so simple. All the products I will be talking about here can be bought at any craft store, or second hand store, even the t shirts.

I do not buy expensive dyes or added chemicals usually used in fabric dyeing. Basically, I dye with fabric paint. Making fabric paint is very easy, you just need 4 things: acrylic paint, textile medium, a clean, empty 20 ounce beverage bottle, and some water.

At the craft store, they sell acrylic craft paints. We've all used them for various crafting projects - here are some samples of brands available. For each color, you will need one bottle.


Toward the bottom or the top of the rack where you got that paint, they also have other things to supplement the paints. One is the textile medium - with this medium, you can turn ANY acrylic craft paint into fabric paint. What the medium does is, it makes the paint pliable - without this medium, whatever you dye will be hard and not wearable or usable. You will need one bottle for each bottle of paint you use.


If you just want fabric paint, you mix equal amounts of the paint and the medium and use as desired. I have "painted" elastic, ribbon, velcro and other items to use in my projects. In this pic, the one on the left is elastic I dyed blue to match the fabric, the center one is organza ribbon I dyed green to match the hand dyed fabric of the cover (see the green in the heart?), the one on the right is velcro for a pocket.


If you want fabric dye, here is what you do. It's equal amounts of paint to textile medium plus water. First, add a little bit of water to your 20 ounce bottle - this is so the paint won't stick to the bottom of your bottle and will be easier to mix. Pour in the paint - get it all in then add some water to the bottle and shake all that paint out. I usually keep adding water and shaking till the bottle is pretty much cleaned out. I do the same for the textile medium. After all the medium is out, I fill up the 20 ounce bottle with water, then shake to mix, and it's ready to go - 20 ounces is a good measurement, anything more will be too liquefied  Even tho I am saying dye, it is really paint, but dye just helps to explain it better.

There are other things you will need depending on what type of dyeing you will be doing. Screens are a must for me, I have a few in different sizes - I can dye right on them and leave my fabric to dry, just rinse any unwanted dye color from the screen so it doesn't transfer to your fabric. A large lid from a plastic storage box is a great surface to dye on - if you don't have one, ask your friends. A towel is very hand - when your fabric is almost dry (not sopping), fold the towel and roll your fabric in it like you would to dry a sweater. PVC piping is great for creating shibori. You can get these at garage sales or second  hand hardware stores for  real cheap or free.


Here some other supplies you will need: large plastic bins or buckets to dye over, a bowl for smaller projects, clamps of different sizes from the hardware store, containers to store your paints - 20 oz. drink containers, empty ketchup or mustard containers are perfect, disposable cups, disposable pipettes, different shaped objects (the acrylic triangles and circles) are useful for doing itajime - small pieces of wood work great as well, hardware clamps - used for clamping the shaped objects to your fabric, Elmer's blue Gel glue - great for creating resists, chop stick for stirring paint, rubber bands for tie dyeing, masking tape, string or strong twine for tie dyeing or pole dyeing. I have also use Pyrex glassware (not pictured) to microwave my fabric (a minute at a time) to set the paint. A lot of the smaller things can be gotten at a garage sales (check the free box) and second hand stores - that's where I got my Pyrex for cheap. Salt (not pictured) is great to use for creating great designs - the salts reacts to the paint and you get awesome prints.


Having a sink nearby is very handy - I don't have a utility sink, so I use a small screen and dye small objects over my sink - elastic or ribbon, I put a small bowl in the sink to catch the paint. It's ok for the paint to go down the drain - just don't let hard globs go down as they may clog your drain, a screen filter helps catch the large globs. For larger items - I have put a large screen over my bath tub with a bowl underneath and dyed fabric. I also dye over the plastic bins.


Here are some recent projects I dyed with fabric paints:

I had some dyed green fabric that I folded and clamped then over dyed with blue - I made this into a Christmas stocking for my daughter. 


I took a t shirt, scrunched it up and held it together with several rubber bands  set it on a screen that was sitting on a large bin. I poured enough crushed ice to cover the shirt (I used a spray bottle to help the ice stick to each other). I then waited for all the ice to melt and got this all over dye. Snow would be perfect to do this with.


For this next shirt - I dyed it a turquoisey green color - the color variation is from using a pipette to apply the dye. I then banded just under the sleeves and dyed with the blue. 


This last shirt was pole dyed - starting from the shoulders, I wrapped the shirt tightly. I then wound strong fishing line around the shirt, trying to make the line even throughout the wrapping. I love the variegated look on this shirt.


See, fabric dyeing is not that hard - really, the hardest thing is to deciding which dyeing method you want to use. Any procedure you read or see about dyeing with dyes or chemicals can be used with fabric paint. Revealing the fabric is the best part - you never know what you'll get, it's always a surprise for me. 

Next week, I will be showing step-by-step how to mix fabric paint and fabric dye. I will even show you  how I clamped and dyed the fabric for that Christmas stocking - read Easy Fabric Dyeing - Part II.

Now, are you ready to try some fabric dyeing?


Comments or questions are always welcomed. I would love to hear what you think of this post or any of my other posts. Thanks!

Thursday, January 10, 2013

CD Visor Holder

 For Christmas, I got 4 cd's that I had asked for. Altho I like music, I was never one for buying cd's, I always listened to the radio. Only in the last several years have I really indulged and actually bought stuff I like to listen to - kinda sad, I know.


Since my cd collection is now growing, I decided I need one of those cd visor holder thingy - and of course, I didn't want to get one of those generic black holders, I had to design it and sew it! I do have one of those small book type holders where the cd's sit in a sleeve, but it can be a nuisance trying to use it when you're driving (I know you're not suppose to do stuff like that when you're driving, but hey, we all do it).

In doing my research, all of the tutorials had straight pockets. Kind of plain, I thought - so I designed my pockets to be semi-circular. I chose 5 fabrics in red, since my Jeep is red and I alternated the pockets. I just happened to have the red polka dotted seam binding in my stash (from a gsale), so I thought it would be a nice compliment to the mostly red and white fabrics I chose. 


I do have a mirror on the inside of my visor, so I had to compensate for that with the elastic. The interior of my car is gray, so I dyed the elastic gray so that when you're looking at it when the visor is up, the gray elastic would compliment and not contrast the visor.


I used one of these cd holders as a template for my pocket. I just used a plate and cut the semi-circular top.


I measured my visor and figured on 8 pockets, spaced 1 inch apart. 


 Here is a close up of the elastic.


I really lucked out with the binding. I did have solid red, but when I saw the polka dots and how they complimented everything else, I knew that's what I had to use. 


Here is how my visor looks - that white patch is covering a vinyl note from the manufacture telling me something I should know. In trying to cover it up the previous owner messed it up and when I tried to cover it, the glue made things look bad . . .


Well, it doesn't look bad anymore! 


 Action shot!! I love that pop of red against the gray interior!


Here is how it looks when the visor is down - see the complimenting elastic?


Mirror in use.


All in all, I think it came out pretty good - I love the semi-circular pocket design. I might make more of these to sell. The best part of this whole project is that I didn't spend a penny, I had everything on hand - that's the best kind of project to make.


So, what do you think of my new cd visor holder?


Comments or questions are always welcomed. I would love to hear what you think of this post or any of my other posts. Thanks!