How do you store your knives? There are several ways they can be stored. A lot of knife sets come in a knife block - it's a block of wood that has individual slots for knives to go in, they are kept safe from other blades and there's no danger of anyone getting cut. There's also wall magnets - a very strong strip of magnet that's usually stuck to the back of your kitchen wall. You place your knives on this magnet, and they stay put till you need them. They could also be stored in a drawer, but unless the blades are covered, there is a danger of getting cut when you reach for them, and the blades can get dull from banging around each other.
I don't have much counter space, so I can't have a knife block and a magnet wouldn't work for me because I'm short and can't reach the back of the wall. Let me show you how I protect my knives that are stored in a drawer.
Almost all good quality knives come with a protective cover. I keep those and use them to protect the blades and my hands. Some of my knives either didn't come with a cover or the cover broke from use, so I make my own and you can make some for you too.
Before I show you how to make a cover for your knives, I think it is important to know the different parts of your knife - this will help with my explanation.
All you need is thin cardboard - cardstock will do or an empty cereal box. You'll also need some glue, double stick tape or even clear packing tape will do.
Make sure the cardboard is as wide as the blade on your knife and tall enough to fold twice around the end of the bolster, plus you add about a 1/2" for your seam. You will be placing the printed side of the cardboard up so when you are done, you will have an unprinted cover, not one with cereal print on it. Here's how I do it:


Make even marks on the other side of the cardboard for each tic mark and using your ruler or edge of the table, create your folds for your sheath - I drew a line so you can see where I folded.

Using your ruler, a pen or something flat, crease all your folds.

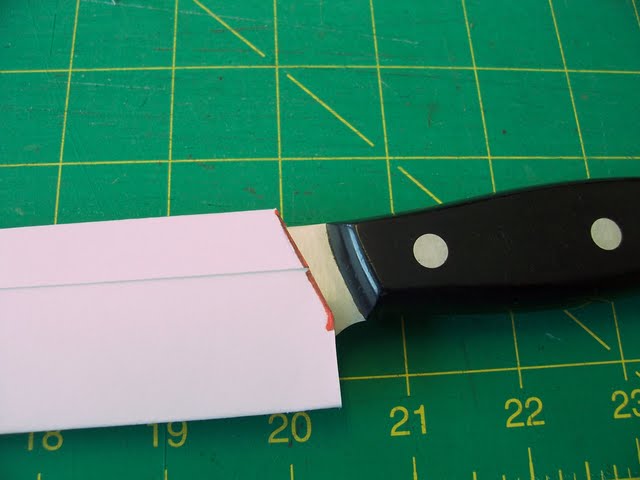
Now we are going to custom fit the cover to the knife.

This is what it looks like when you are done. Doesn't look that great, but we are going to fix that.

One more important thing about knives -

I think it is critical to have a designated knife for cutting raw meats to prevent contamination, so I mark mine with a sharpie so everyone in the family knows (I also have a seperate cutting board for cutting meat and sponge for washing items used to cut raw meat).
So there you go, now all of your knives will always be sharp and ready to use by being protected with their own custom covers.

Some well used knives.
Thanks for reading!!
2 comments:
Thanks for the great idea and steps! I'm going to try this at home this week! I needed some for covering my knives for camping!
You're welcome Journey into Love - I'm glad this will help you.
Post a Comment